Sunday, February 5, 2012

Valentine's Day Tea Party Prep Continues!

Hi Everyone....I am still getting ready for the fabulous Valentine's Day Tea Party....I found some pink hot chocolate at Marshalls which I think the girls will love.  Then, while shopping at Target, I found pink heart shaped marshmallows....how cute is that?  Marshalls also had some Martha Stewart decoration kits pretty cheap, so yes, I am going to cheat and use them - I promise I will post picks next week after all is put together.

Anyway, on to today's project....I got the most fabulous camera for Christmas - a polaroid!  Well, actually it is a Fuji, but same concept.  Here's a picture of this cute little camera that pops out the cutest sized pictures - credit card sized!
I am the guest designer on today's PaperCraftWeekendChallenge's blog today and needed to make a project using some product....go to http://papercraftweekendchallenge.blogspot.com to see the dilemma I had figuring out what product lol!  Anyway, I wanted to give the girls a picture to remember this day and these pics needed a frame.  I pulled out my Cricut Fancy Frames cartridge and found just a simple rectangle frame.  I cut it at 3 inches - the length of the picture I wanted to put in the frame - using my Gypsy, I was able to see that the opening would be pretty close to the right size for this picture.  Then, I cut the rectangle border at the same size.  I figured I should cut the vertical easel the same size....well.....not quite - what came out was a tiny back for the picture.  I used the gypsy again and decided that 4.5 inches would be just the right size.  Here is the final picture.
So, here are the details....all of the papers are from Papertreyink.com.....I used Stickles glitter - yes, I said Stickles glitter - isn't it fabulous?  I am lucky enough to live about 20 minutes from where Ranger is located and every fall they have a warehouse sale - that's where I picked up that oh so glittery glitter! You can't really see it, but it is gorgeous!  I cut the heart using the Imagine's heart that is loaded into the machine at 1.5 inches and then embossed it with the Cuttlebug Swiss Dots folder.  I punched holes in the middle of the heart and threaded the beautiful Valentine's Day Divine Twine and a button and pop dotted that baby onto the frame.  I think I forgot to say that I hand cut a piece of chip board to glue the patterned paper to to make it sturdier...I left the top open so we can just slide the pictures into the frame on party day.  I also cut the vertical easel out of chipboard on my good old work horse, Cricut Expression.  Here's a picture of the back.
So that's it!  Hope you like!  Thanks for stopping by!

Friday, January 27, 2012

Valentine's Day Wreath for papercraftweekendchallenge.blogspot.com

I was so honored to be asked by Caroline and Allison to create a project for their weekly blog.  This is what I came up with.  

I love to make home decor items with paper.  You have such a diverse selection of colors and patterns....it just makes me happy!
This wreath is similar to my Halloween wreath.  I found the My Mind's Eye Lovenest paper at AC Moore (used my gift card from Mom!) and knew this would make a gorgeous wreath.  I found some pink with brown polka dot ribbon that I thought would be so pretty with the paper.  I also found the Epiphany badge maker thingy which I thought would make pretty centers for the rosettes.
Well, once I started working on the wreath, I realized that that ribbon just wasn't going to work....it was not bold enough to stand up to the muted colors of the paper.  I mosied my way to Michaels where they had their Christmas ribbons on sale and found Gorgeous brown sparkle ribbon (gotta have that sparkle!) - that did the trick.  I cut my rosettes from Cricut Ribbons and Rosettes cart. "Celebrate Love" is cut from Lyrical Letters and I really can't remember where the hearts came from, but you can use any heart.


Once you have everything cut, now you get to assemble the wreath!  I kept moving things around and moving things around until I found the configuration I liked... I tied a sheer ribbon on the top to hang the wreath.  Here is the final product!
So Pretty!

Thursday, January 26, 2012

Getting Ready for Valentine's Day Tea Party

Every year Lizzy and I have a Valentine's Day Tea Party for our little friends, Lizzie and Caroline.  Lizzie is 6 and Caroline is 4 this year.  We decided to really do it up this year and invite a few more of Lizzy's friends.  I have been busy getting decorations ready.
First I want to show you the placemats that I made for the table.  I was inspired by two things for this project...the first were some placemats I found at Target.  They are red and have a fork, a knife and a big heart for the plate.  While browsing the Cricut Circle Blog one day, I saw that Jana Eubank made her own placemats....she suggested getting them laminated which is what I did.
A few hints for these...first and most importantly source where you are going to laminate these and find out how big the shop can make them and how much!  Luckily I know the owner of the local copy shop and he gave me a good price of $2.00 a piece.  The only drawback is that the largest he could do was 11x17".  So, I took a 12"x12" piece of paper and cut it down to 10 1/2" and added two pieced of patterned card stock that were 21/4"x 10 1/2" and adhered them to the sides.  I cut the fork and knife from the From My Kitchen Cartridge and the heart came from Hannah Montanna Cartridge.  I think they came out cute and will be adorable on the table!

My next project was totally inspired by LindaK on the Cricut Messageboard.  She made an adorable cupcake card and attached earrings that she made as sprinkles.  This got me thinking that I can do that as party favors for the party!

I used my Imagine and the All Wrapped Up Cartridge and cut out the cupcake box at 9".  I made the earrings with Svarofsky (sp?) crystals I bought at Michaels.  I found earring backs online that were the same size - 5 mm and glued them onto the post with 600 glue.  I them put holes in the cupcake and attached the earrings in the centers of the flowers on the patterned paper.  These came out so cute...I am going to put Hershey Kisses in the boxes and the girls will have a great memento to take home with them!
Hope you like these projects for today...let me know what you think!  Check in tomorrow....I am the Guest Designer on Paper Crafters Weekend Challengers Blog!  I will be showcasing my Valentine's Day wreath.

Sunday, January 8, 2012

Happy Birdieday!

So, it has been a ridiculous amount of time since I have posted here and I am going to try to do better!  It was a rough fall with cheerleading taking over our lives, then the holidays came and along with the cheerleading and holidays came unbelievable gallbladder attacks which ultimately landed me in the emergency room on 12/21 - yes, 4 days before Christmas!  Had the gallbladder removed on the 23rd and was home in time for Christmas!
While on disability leave, I have been getting crafty and will be posting all of my work when I get the chance...unfortunately all good things must come to an end and back to work I go tomorrow - boo hoo!

Anyhoo....here is a a birthday card I made for my niece, Sydney, who is turning 14. I used the sketch that Allison posted in the Paper Crafter Weekend Challengers challenge for yesterday....check out that great blog at  papercraftweekendchallenge.blogspot.com .  I had no idea what to make for her....she lives in West Palm Beach, FL, so I don't get to see her and don't really know what her interests are....so here was my challenge for myself...I decided to open my drawer of cricut handbooks, close my eyes and pull one up...whatever cart came up, I would make a card from....Straight from the Nest was the lucky winner!  I wanted to incorporate my new favorite Imagine artwork cart...Notebook Doodles...just love those papers, so I used that for the background....the birdie is flocked and on an action wobbler!  I think it is kind of fun and it was great to use a cart that I haven't used in a while!
Let me know what your think!

Saturday, September 17, 2011

Wow...it has certainly been a while!

Hi everyone....I know, I know, it has been a while since I have posted anything here....been super busy with cheer practice, swim practice, work, life!  I have managed to do a project...this was completely new to me and it is totally scraplifted from Faith-Abigail's blog....check it out...i don't know how to post links yet, but if you do a search you will find her.

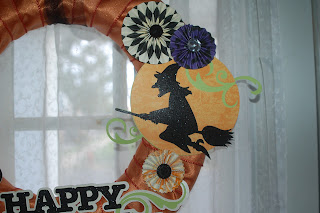
I did practically copy her wreath, but did add a few touches of my own...the paper is Recollections Midnight Magic stack from Michaels....can I just tell you that I adore this stack....have you ever seen Halloween toile???  Love it!!  The wreath is a styrofoam wreath I picked up at Mikes- it is wrapped with this cool orange sparkle ribbon I found at Walmart for get this, $1 a roll...I picked up 3 so I can make this wreath 2 more times - yay me!  The black paper is glitter paper that I actually paid $1.99 for - yikes - but it is so worth it!  The camera doesn't really do the sparkle justice...it is gorgeous!

I wrapped the wreath with the ribbon and then made all of the cutouts from Celebrate with a Flourish cart....the large rosettes are hand done with my Martha Stewart score board and the smaller rosettes are from the Tim Holtz rosette die...love that thing!  I put big rhinestone brads in some of the rosettes and some have buttons in the middle.

I used that really sticky red tape to put the cut outs on the wreath, but within a few hours the rosettes were falling off...so i ended up pinning everything on...they should stay there now!

Hope you like it!


Tuesday, September 6, 2011

It's the Most Wonderful Day of the Year!!!

Hi All...I am in such a relaxed mood right now...I have the house to myself until about 1:00 when I have to go to work at the bank, I have the People's Court on TV in the other room, am on hold with Provo Craft for over 22 minutes now waiting for them to pick up (thank heavens for speaker phone) and I am all by myself in the house - did I mention that already!

I am in the process of learning everything I can about this Blogger thing....going to try to customize this thing, but I really truly am computer illiterate, so this could be kind of tough for me.  In the meantime, I wanted to post a picture of the card I snuck into Lizzy's lunch bag today to welcome her to 6th grade.

I love my Cricut Imagine as I was able to whip this up in no time this morning.  I used the  Enjoy the Seasons cartridge...I cut the square at 2.5", the apple with worm, including layers at 2.5" as well...I used Papertreyink.com's rustic white cardstock for the base, you can't tell, but the apple is on a action wobbler...so fun!  I pop dotted the worm and the leaf.  The ribbon is from a grab bag of ribbon I won at the CK Scrap and Play I went to in Lancaster.  Oh and I also used the my Imaginesce (sp) gem tool to heat set the gems on the apple.  So cute!!!

Monday, September 5, 2011

www.papercraftweekendchallenge.blogspot.com rocks!!!!!

Hi all!  I want you all to check out this awesome blog....each weekend Allison and Caroline post paper challenges to get your creative juices flowing....I first discovered them on the Cricut.com messageboard.  They helped me so much to get so many projects done.  I am definitely going to keep active with this new blog...you will get great ideas and motivation to keep working!  The fact that these are weekend challenges makes it so much for doable for me as I work all week and find it really hard to get creative after long weekdays!  The other great thing is these ladies are easy and loose (no I don't mean that in the smutty sense!)  there really are no rules with them...right or wrong you will get praise on whatever you come up with

So, without any further ado, here is my first project from this week's challenge...it was a sketch challenge and I needed to finish catching up with Lizzy's school album, so I used their sketch to make the following layout.  I used my Imagine machine from ProvoCraft to create the background papers using the JT Cartridge.  I also cut the images from that cartridge.  The number 5s are from the StoryBook Cartridge and I used the papers from JT.  I was also able to use the bakers twine I have been collecting...it is Divine Twine.  I always loved the look of the twine and felt it looked really cute wrapped around the pictures.  I am not sure if you noticed, but I journaled around the 5s...was able to document a lot of what Liz accomplished this last year.